This article shows you how to use AWS CLI programmatically to automate your deployment process. We’ll upload assets to S3 (specifying their ACL and caching behavior) and invalidate CloudFront cache. Starting with a local shell script, we conclude with plugging the script into our CircleCI workflow. It may be especially useful if you’re using Rails with
Webpacker, but no experience with Rails is required.
My latest Shopify app Robin PRO renders image galleries on customer stores. When the store loads, it fetches a remote script (client.js) together with a stylesheet (client.css), requests gallery data and renders the result.
How to serve these assets?
All the app assets are served from a CDN, so why not just serve them from the same distribution, right? There are 2 challenges with this:
- When creating a script tag with Shopify’s API, you need to provide a URL of the remote script. This means that the URL cannot change, otherwise the script tag would point to a wrong location. Rails fingerprints compiled assets, so their URL changes with every change of their contents.
- I split JavaScript bundles into chunks in production but I can only have one remote script.
Given these constraints, I settled on the following workflow:
- Temporarily disable code splitting of JS bundles.
- Precompile assets for production locally.
- Upload
client.jsandclient.cssto S3. This is a standalone bucket with its own CloudFront distribution. It gives me asset URLs the app can depend on. - Set their caching behavior and ACL so that they come with public access. Setting
Cache-Controlheader is important. The URL of the asset never changes, so on one hand, we want to make sure that no browsers cache them forever, on the other hand, basic caching helps performance. - Invalidate CloudFront cache to force clients to fetch the latest assets.
All in all, not too terrible to do manually in a few minutes if these releases are infrequent. However, once they do get more frequent, it’s time to optimize the process - you’re wasting a lot of time on something that a machine can do both better and faster.
Making a tedious process fully automated is one of programming’s greatest joys.

Asset deployment script
Let’s tackle the 5 steps outlined above one by one. My script is placed in bin/publish_client. You can find the full source in this gist.
Selectively disabling code splitting
Any environment variables you pass to Webpacker can be accessed from process.env object. With that in mind, we can set up our production.js file to watch out for a variable that’d disable chunk splitting:
if (!process.env.PUBLISH_CLIENT) {
  environment.splitChunks(config =>
    Object.assign({}, config, {
      optimization: {
        splitChunks: {
          cacheGroups: {
            vendor: {
              test: /node_modules/,
              chunks: "all",
              name: "vendor",
              enforce: true
            }
          }
        }
      }
    })
  );
}
Precompiling assets locally
We can start writing our shell script:
#!/bin/sh

# Clean slate
echo "Cleaning up old assets and packs..."
rm -rf public/assets public/packs

# Precompile assets for production
echo "Precompiling assets..."
bundle exec rake assets:precompile RAILS_ENV=production PUBLISH_CLIENT=true
In the first step, we clean the public folder. In the second one we precompile assets in production environment. This will minify your code, etc. We pass in the PUBLISH_CLIENT flag to make sure we get one JS bundle for each JS pack.
Uploading assets to S3
We’ll need AWS CLI to continue so install that first.
Then we’ll need an IAM user with permissions to access S3 and CloudFront. Navigate to your IAM console and follow these steps:
This gives your user full access to S3 and CloudFront. In general, it’s a good idea to make these permissions stricter but I’ll stick to default policies for the sake of simplicity.
Next, run aws configure in your terminal, you will be prompted for these four inputs:

Insert the credentials obtained in the previous step. They’ll be saved under a default profile found at ~/.aws/credentials. Now you can use AWS CLI and authentication will be handled automatically for you. Try running aws s3 ls - if you can see a list of your S3 buckets, you’re all set!
Copying our assets to S3 becomes trivial:
# Upload client JS
echo "Uploading client JS to S3..."
js_file_path=$(find ./public/packs/js -name "client-*.js")
aws s3 cp $js_file_path s3://awesome-gallery/js/client.js \
  --cache-control "max-age=86400" \
  --acl public-read

# Upload client CSS
echo "Uploading client CSS to S3..."
css_file_path=$(find ./public/assets -name "client-*.css")
aws s3 cp $css_file_path s3://awesome-gallery/css/client.css \
  --cache-control "max-age=86400" \
  --acl public-read
ACL, headers, and lots of other stuff can be set by passing options to the cp command. See the docs for more info.
Invalidating CloudFront cache
Now that the assets are uploaded, the final step is to invalidate CDN cache:
# Invalidate CDN cache
echo "Invalidating CDN cache..."
aws cloudfront create-invalidation \
  --distribution-id E37OOSQGDX84GR \
  --paths /js/* /css/*
And that’s it! From now on, all we need to do is run bin/publish_client 🎉
But you know what’s better than running a script every time we release a new feature (and forgetting to do so every now and then)? You guessed it: plugging the script into our CI workflow so that we never even have to think about it again.
CircleCI job
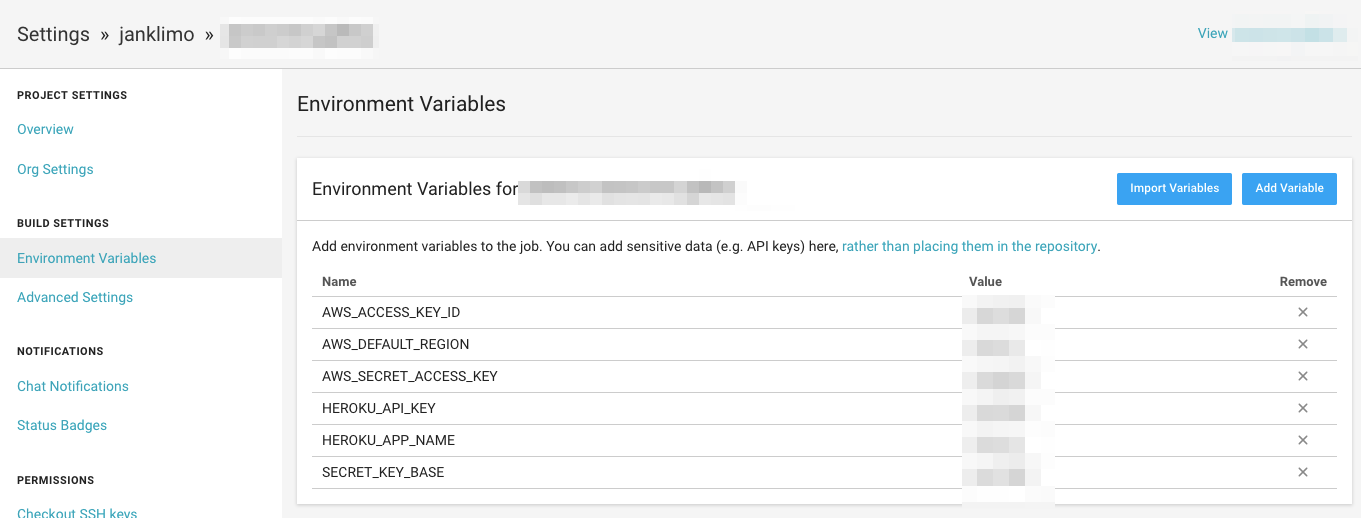
We’ll want to keep our credentials out of source control, so let’s begin by configuring them as environment variables in CircleCI. Under Build settings - Environment variables, set AWS_ACCESS_KEY_ID, AWS_SECRET_ACCESS_KEY, and AWS_DEFAULT_REGION. AWS CLI defaults to these variables so they’ll be easily found.
Strategy
To begin with, my CircleCI workflow runs two jobs: one to run specs, the other one to deploy to Heroku. Let’s add a third one named publish-client that runs our shell script after we deploy to Heroku successfully.
Steps
We’ll make use of orbs functionality in CircleCI 2.1. At the beginning of config.yml, add:
version: 2.1
orbs:
  aws-cli: circleci/aws-cli@0.1.13
so that we can easily define installation and configuration steps with:
publish-client:
  steps:
    - aws-cli/install
    - aws-cli/configure
Because we have AWS CLI installed and configured, we can run our shell script like we would do locally:
- run:
    name: Publish client
    command: bin/publish_client
Finally, let’s make sure publish-client runs only if deployment to Heroku was successful.
workflows:
  version: 2
  build-deploy:
    jobs:
      - test
      - deploy-master:
          requires:
            - test
          filters:
            branches:
              only: master
      - publish-client:
          requires:
            - deploy-master
          filters:
            branches:
              only: master
Clearly, I have extracted only the interesting bits from my config.yml file. If you’d like to see the full version, you can find it here.
echo "Done!"

In this post we’ve converted a slow, error-prone workflow to a fully automated one in under 10 minutes. I hope you’ve found the process as satisfying as I did and that it gives you inspiration to optimize your own! I’d love to hear what you come up with 👍